1. Quickstart & Typical Workflow
This chapter shows how to install LumaPrint, launch the desktop studio, and create your first color-managed Fine-Art print in four steps.
1. Installation & Launch
Build & Install from Source
cargo build --release --workspace
sudo install -m 0755 target/release/lumaprint target/release/lumaprint-cli /usr/local/bin/
./bin/install-desktop
Running ./bin/install-desktop installs the desktop entry (de.colorcube.lumaprint.desktop), AppStream metadata, and icons into ~/.local/share so LumaPrint appears in your application launcher.
Launching LumaPrint
Launch LumaPrint from your desktop application menu or from a terminal:
# Start with an empty session:
lumaprint

# Or pass one or more image files directly on the command line:
lumaprint ~/Photos/FineArt_01.tif ~/Photos/FineArt_02.tif
Tip
You can configure LumaPrint as an external editor / print helper in Darktable, RawTherapee, DigiKam, or Geeqie by passing the exported 16-bit TIFF file path as a command-line argument to lumaprint.
2. Your First Fine-Art Print in 4 Steps
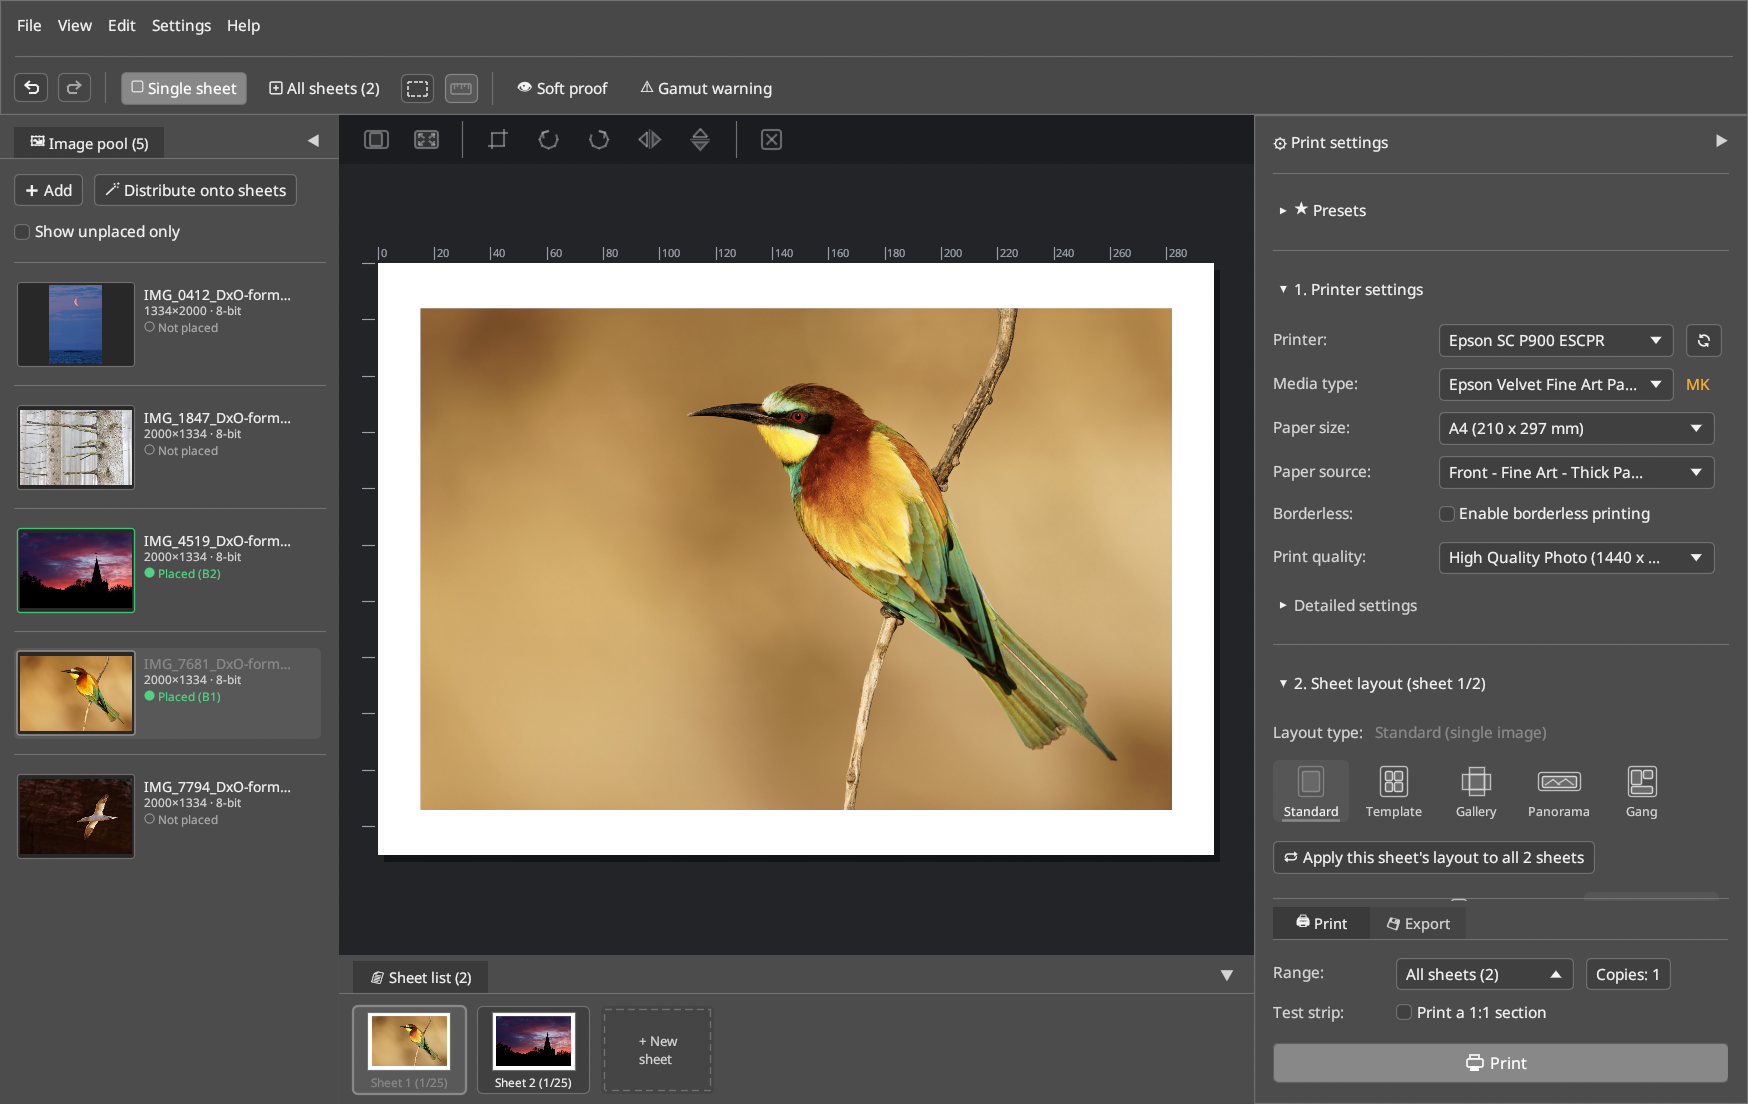
Step 1: Import Images into the Image Pool (Left Dock)
- Click + Add in the 🖼 Image pool dock on the left (or press
Ctrl+O), or simply drag and drop.tif,.png,.jpg, or.webpfiles from your file manager into the window. - To place an image onto the current sheet, double-click its card in the Image Pool, drag it onto a slot on the sheet, or click 🪄 Distribute onto sheets to automatically populate sheets with all unplaced images.
Step 2: Select Printer, Media Type & Paper Size (Right Dock → 1. Printer settings)
- Choose your CUPS queue under Printer (e.g.
Epson_SC_P900). - Select your paper under Media type (e.g.
Velvet Fine Art Paperor a custom paper installed viaepmi). - LumaPrint automatically selects the matching black ink badge (
PKPhoto Black vs.MKMatte Black) and default Paper source (e.g.Rear feed (sheet)orFront feed – Fine Art). - Select the Paper size (e.g.
A4,A3,A3+,A2) and Print quality (e.g.High quality / Photo (1440 x 1440 dpi)orMax. quality (2880 x 1440 dpi)).
Step 3: Adjust Layout (2. Sheet layout)
- Choose a Layout type:
- Standard: Single image on the sheet. Drag the corner handles directly on the canvas to resize, or enter exact millimeter margins / print dimensions.
- Template: Multi-image contact sheet or Bento layout (up to 25 slots).
- Gallery: Canvas stretcher frame with mirrored or shaded wrap borders.
- Panorama: Roll paper / banner print.
- Gang: Automatic space-saving nesting of multiple print sizes.
- Use the frameless icon strip directly above the sheet to switch between Fit (
Bild einpassen) and Fill (Fläche ausfüllen), open the Crop modal (✂), or rotate/flip the image.
Step 4: Configure Color Management, Softproof & Print (3. Color settings & Footer)
- Under 3. Color settings, select your Color mode:
- Color-managed (ICC paper profile): LumaPrint applies the paper's
.iccprofile (with Relative Colorimetric intent + Black Point Compensation by default) and disables the printer driver's internal color correction (NoColorAdjustment). - Printer automatic: Sends the image in
Adobe RGB (1998)(LUT 0x06, matching Epson Print Layout) to the printer driver. - Black & white (Advanced B&W): Enables neutral or toned monochrome printing (Advanced view).
- Optional: Click 👁 Soft proof (
Ctrl+Shift+S) in the top toolbar and enable Paper white to preview how the paper's white point and black density will look underD50 (5000K)viewing light. - In the sticky bottom footer of the Right Dock, choose the Range (
All sheetsorCurrent sheet), optionally enable Test strip (Print a 1:1 section) to print a narrow test band first, and click 🖨 Print (or switch to the 💾 Export tab to save a 16-bit TIFF/PNG sheet).
3. Headless CLI Quickstart (lumaprint-cli)
For batch workflows, studio automation, or printing calibration charts without opening the GUI, use lumaprint-cli: